Thursday, September 27, 2012

Master Bedroom touches


 This is our master bedroom.  We really try to make it our little oasis with our own little touches.  I continue to see ideas in magazines and Pinterest to improve our space.
Todd and I made this headboard a few years ago.  We found the fabric first, designed what we liked and spent an evening after the kids went to bed and put it all together.  (stained ahead of time).  I have more photos of this project on the computer somewhere.  I'll have to post another time.  We also painted our walls a darker, more romantic color.  The ceiling is the maroon too.  Then one day while shopping at Sam's Club, I saw this bedding.  It's a perfect fit.  It came with two additional 20x20 shams that I still have not purchased pillows for.  I'll get to it.


I thought I'd share some of the pillows we have on our bed too.  I found this tonight/not tonight pillow some time ago and started giving as a bridal shower gift too.  It was in a catalog, but you can google and find many variations.  search: "tonight not tonight pillow".  And the heart pillow has a pocket that we can leave notes for each other.  This usually happens around our Anniversary or Valentine's Day.


A new update is curtains.  We have shades on these windows that came with the house, but never did anything with them.  I found these curtain panels at abc distributing.  I had the rod from our previous house unused.  I saw a pin about anchoring from the ceiling for additional height vs just above the window frame, so that's what I did. The color is perfect.  I used 3 panels.  The middle panels hangs on both sides.  I can pull them all back for light or window open breeze.  We found the lamps at Lowe's.  They had a display on brown and reds for bedrooms.  It was a purchase now because we wont find them again kinda day.  The base is very dark, probly an espresso, not quite black. The pin I used for my curtain inspiration:  from the ceiling

Wednesday, September 26, 2012

first day of school memory


 Pinned it!  Did it!
This has definitely been a popular pin type and many followed through.  I saw it all over facebook those weeks of August and September.  The original pin is below, and I do like it best.  I tells what the child wants to be when he/she grows up, and I wish I'd remembered that.  I have seen some additional memory ones with multiple questions for a scrapbook.  So, I'll make up for it there!  I plan to get more creative with my board next year too.  I like the whiteboard look, but I didn't put any effort this year... the day was all the sudden here!  Oh well, next year right?
original pin

Tuesday, September 25, 2012

Mommy and Me Journal


Pinned it and Did it!

Found this pin and loved the idea of staying connected with my 10 year old daughter.  She has 2 younger boy siblings and time can be limiting with detailed or in depth conversations that she needs.  I found this book at the dollar store, the color was perfect and the price was just right too.  I used a sharpie to write on the front.  I wrote the first letter, explaining that it was a way for us to communicate about anything she wanted to share, learn or vent about.  She took to it right away.  I leave it at her bedside when I'm done and she does the same.  It's a connection I wanted with her and I love that it's documented for us to go back to, or when she has kids I can show her what life was like "back then" :0)


Mommy and Me journal. Write letters back and forth.. leave under pillows

Monday, September 24, 2012

Baby Birth info FRAMED


Pinned it! Did it! 

This was much easier than I expected.  I have a template if you want to give it a try yourself, or I can do it for you.. Email me: brandisulak@gmail.com


The pin source that did it herself, and where she saw it on etsy is here:
http://lorrinteriors.blogspot.com/2011/07/sophisticated-baby.html

Have fun with it.  I just did all my kids and now working on some Christmas Gifts!!!

Thursday, September 20, 2012

My Mama's Guac


My Mama's Guac.  It's the best I've ever had.  My mom made this all the time and I'm not sure if she came up with the mix herself, but it's awesome.
This batch making consists of 5 avocados.  Cut in half and get remove the pit.  Use a spoon to get the avocado out.  
Do you know how to check if the avocado is good or not?  Use this trick at the store too.  One way is the firmness of the skin.  Squeeze, if it's really hard is not ready, so you can purchase and let them soften at home.  But if they are not firm, pick off the top.  Not sure what it is called.  It's like a button to the avocado.  If it's green, you are good.  If it's brown, it's too late for them :0(
Once they are all in a bowl, use the same knife you cut them in 1/2 with, to then cut them in the bowl.  just random where ever to get into smaller pieces.  You can mash with a fork too.  Sometimes I put in the blender to make super smooth, but it's not necessary.  Make sure to use a stainless or glass bowl when you do the knife cutting trick in the bowl.  The knife will make marks in your plastic bowl.  


These are all the ingredients:
(these are the basis of mine, but you can add or remove what fits your taste)
5 avocados
1.5 t. salt
1 t. garlic salt or powder/or raw garlic
2 c. salsa, fresh is best (mine is artisan fresh from sam's club) unless I can make my own
2 c. cottage cheese (secret ingr!)
2 T. or more of lemon juice, fresh is best (not shown)


Mix it all up, and do a taste test if you need to add more.  It's usually the lemon or the salt that are needed.  But you can add more of the salsa and cottage cheese to increase the ratio and have more for the quantity of avocados.  Make your avocado go farther :0)

Here's the after.  So fluffy and yummy.. These rectangle type chips are the best, my favorite, but pick your fav and dig in!

This is a great teacher and welcome to the neighborhood gift with a bag of chips or not.  I have one teacher that loves it and I give her a jar from time to time and she's not even my daughters teacher anymore.  It makes me happy that she loves and enjoys it.


enjoy!  and tell me if you try it, and like it of course!!


Flour Tortillas - from scratch

Have you ever tried to make your own tortillas?  This is the best thing I've ever done in my kitchen.  We love them and was so glad to find a recipe to start on my own.  It's very simple and you roll out like any other dough.  Once you get the hang of it, you can get it 2 batches done in 30 minutes or less!
more photos: http://www.facebook.com/media/set/?set=a.155895107799152.48260.154006707987992&type=1
(some girlfriends and I started Eco Friendly Girlfriends club, and this link is to our facebook page we share pictures and other info - feel free to like while you are there)

I use an electric mixer with the dough hook.  Adding the flour and salt together first.  Then the water until mixed well.  Adding the oil last.  I use EVOO, I like the taste better.  Once combined, I dump it all on the rolling mat, separate the dough into workable balls.  The smaller the ball, the smaller the tortilla.  A nice size in your hand would equal a burrito size tortilla.  I flour the ball and put it back into the mixer bowl until the dough is all "balled" up.  Just making it an assembly line.  Using a flat pan, start the burner to get the pan hot, on a medium heat or they will burn.   Then I take one ball out, flour the mat, flatten a bit with my hand and start rolling.  Once rolled out, put on the pan to cook.  It will bubble up and that is when you know to flip it.  While it's cooking, I'm rolling out another.  Once the 2nd is ready to cook, the bubbles have formed and I can flip it for a second or 2 cooking on the reverse side.  Take it off completely to cool and place the next one on the flat pan.  I use a Tupperware pie taker to store mine in.  My mom taught me that trick when we were growing up.  The Tupperware freezes too, so when I make enough to freeze, off they go to the freezer without having to use baggies, personal preference.
My sister in law and I made these for our end of the year gift to teachers last year, so be did baggie them up, and they do freeze just fine.  We froze them as we went along and pulled them out on the last week of school to hand out along with the recipe to make more of their own.  I wonder if anyone did?

I use flour from Whole Foods.  I have tried flour from Sams (in bigger quantity to save money) and whatever you get from the regular grocer, and noticed an incredible difference when switching to Whole Foods 365 brand.  I've also tried whole wheat, and 1/2 and 1/2.  It didn't go over as well in my house, and the 100% whole wheat was a bit hard to roll into anything (it would break).  We make a lot of quesadillas and roll-ups in this house.

The recipe I use religiously: http://www.cooks.com/rec/view/0,2357,154176-235203,00.html

I love making these so much, my kids got me a tortilla press for Mother's Day a few years ago.  I tried and tried to use it, but it's not for me.  It sits in my pantry unused.  My girlfriend has one and loves it.  So, to that.. I say, give it a try, but see if you can borrow one first :0)

Have fun and tell me if you tried it.. I really want to know!  I've even done tortilla making parties at my house to for people to see how easy it is to do!

Wednesday, September 19, 2012

No Bake - choc peanut butter w oatmeal cookies


Another, Love it! Pin it! Do it!
I saw this the other night and had all ingredients so I made them for dessert for Sunday Family Dinner.  What you see above is all that is left :0)  The batch made at least 40, but it depends on how big you make them. 

I did alter the ingredients a bit.  I used Ghirardelli choc chips (a handful) instead of the 4T cocoa.  I am also going to try with 1/2 the sugar next time too.  I used organic sugar vs the white refined.  Not sure if that made a difference, but they were a bit sweet, and I love sweet.  The author blog below is the Pinner I used,  in her discussion she mentioned how sweet they were for them too and I thought it may be a the answer.

Chocolate Oatmeal No Bake Cookies
1/2 C Butter
2 C Sugar
1/2 C Milk
4 Tbsp Cocoa
1/2 C Peanut Butter
3- 3 1/2 C Quick cooking Oats
2 tsp. Vanilla

Add the first 4 ingredients in a saucepan. Bring to a rolling boil, and boil for 1 minute. Stir in the next 3 ingredients and drop onto wax/foil paper. Let cool until set.

http://morganmoore.typepad.com/one_more_moore/2009/04/when-its-too-hot-to-bake-we-nobake.html

Monday, September 17, 2012

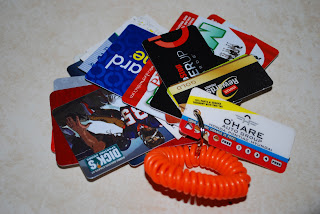
Cards on a keyring

I love Pinterest!  The ideas are flowing from everywhere about everything.  
So, I have all these boards of things I want to do, make, bake, eat, and ORGANIZE.. 
and then this one came up:

I dont want to just be a Pinner, I want to be a do'er.. so here's pin complete!

Some of my cards have a whole punched already, the mini's, but the big cards did not.  So I used my 3 hole punch, has more power and easy on the hands.  I doubled checked the back of each card to make sure I was not punching through the mag stripe or any other info I may need to read.  I love it.  Showed the hubby and dau so they know where to find everything too.  What a quick improvement!
 I have been hanging my keys from a carabiner forever, so I switched from the corded to another carabiner and clipped it on.  I'll probably have it in the pocket of my purse, but I've got options!


Friday, September 14, 2012

How to on Wild Kratt's creature power suit

Here's all the stuff I used for each shirt.
(not interested in making your own?  search on creature power suit on ebay, i'll help you out!)

 Recycle some cardboard and cut out a circle size.
                 = 3 3/4" and 4" for the center of the paw.  Either is bigger than the disk.
                 = 1 1/2" for the paw toes.
                 = 1 1/2" square for top of shirt
                 = cut two squares above and then one in half for the rectangle.
                 = clear circle (hard to see but on the right) This circle is actually too big, I trimmed once sewing was complete.  The same size as the center paw is good.
I used the clear stuff to make a pocket out of the whole thing.  they had their disks in the front for current animal, and storage in the back as we went along.  Tried using iron on stuff for the felt, but most of them came off, so I sewed them on (this example is just the iron on stuff for the paw toes)
The clear stuff is what you'd cover a table with.  I found this at ACE hardware, but have also purchased at JoAnns and Hobby Lobby.  You wont need very much, I bought 1/4 of a yard for 20 shirts.

Here's all the games we played.  I numbered afterwards vs rewriting the list.  I organized the yard to set up a few games ahead of time.  I'll post detail and photos on the games in a different post.  We had 10 disc powers in all.  2 were just given in their coloring book they picked when they left (Animal Planet kind of books along with some fun facts I got from another blogger.. I'll post later too)  We used the butterfly for snack/cake time because I made Popsicle vs the traditional cake.  They loved it!

Jewelry closet

We had a remodel project this spring for the master suite area.  While moving walls and making a wonderful shower, I took the opportunity to build myself a jewelry "case" in the wall.  Still looking for just the right mirror to complete the project, but it's awesome.  I used brass hooks w/screw ends to hang.  Accommodating necklaces, rings and bracelets.  I used a ruler and level to ensure uniformity.  Love it.  (I'll post bathroom part in another post)

Thursday, September 13, 2012

Wild Kratts party

Do you know who the Kratt Brothers are?  My kids sure do!  They love Martin and Chris.  As a result, it was our bday party them for the 6 year old.  I made the creature power suits and 10 different creature power discs.  We used them to play games during the party.  It was so much fun!  I'll post more info later.  Just wanted to get this one out there.
All of our little Kratt friends.  Should have gotten an offical group pix, darn it!


Sawyer Christian Moss!


Tuesday, September 11, 2012

Baby Moss 2012

 This was taken Saturday.
Becky's in LABOR.  As of 9pm, she's 5cm.  On my way to the hospital now!!!

Little change in the living room

We made a change in the living room this week.  This table was given to us from a friend, when they no longer needed it.  We didn't have anything for the middle of the floor, so it seemed like a good idea.. temporarily.  Here's out little setup.
Then Groupon posted a deal to purchase an ottoman with storage.  It was something we thought would be a good idea when we found the right one, for the right price.  After seeing Groupon, we did a Google search on the brand mentioned and priced out that it was not the best deal after all.  In fact, there is a warehouse just 20m south of us that housed such ottomans, plus so much more.  We we took Sunday afternoon to check it out.  But needed to be back before football.  "Ok Honey..."
We are HUGE fans of Groupon, but this time.. it just wasn't the best deal.  I think it's really becuase we live so close to the warehouse though!  bonus.  So, above you can see our two little ottomans.  Which turns out to be a bit of an upgrade.  The ones posted were hinge lids.  Same size though, but we really like this flip lid/tray combo.  Now, everyone can lounge...

Monday, September 10, 2012

The fridge.  I hate cleaning it out.  I find science experiments in there, and I'm the only one who eats left overs unless I disguise it from my family into something new and exciting.  In addition, we find it hard to find the basics.  And when I say we, I don't mean me!  So, today, this is what I did in the fridge.  
Lets see how long or how well it works.

I made little post-its for each shelf listing items that are on that very shelf.

Today is the day!  I'm blogging again.  I'm expanding my scope to be all things that I love or experience vs just updates on the kids for family and friends.  I'm so excited to get it out there. Hope you love it too.. enjoy.